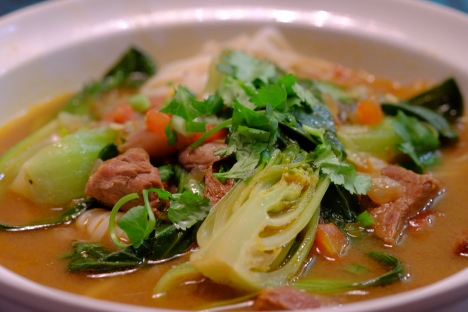
Spicy Beef Noodle Soup

My family LOVES trying different ethnic dishes! Our travels are always tailored around food, and we’re especially drawn to all the different Asian cuisines.  Thai, Indian and Nepalese are among our favorites, as we just love the combination of all the different spices used to create these dishes.  I’m always so excited to get back home and try recreating the amazing food we’ve found on our trips!
This particular soup has so many of the flavors we love in a dish (garlic, ginger, miso, chilies), so when I read over the list of ingredients, I knew we were going to love it!  I was RIGHT!  The soup is SO full of flavor with just the right amount of heat. With plunging temperatures all around the country right now, this soup will definitely warm you up!
Spicy Beef Noodle Soup Spicy Beef Noodle Soup

Spicy Beef Noodle Soup

adapted from Cooking Light Magazine

Serves 6-8

Ingredients:

  • 2 T canola oil, divided
  • 2 lb. boneless chuck roast, trimmed and cut into 1-inch pieces
  • 1 ½ C chopped onions
  • ⅓ C minced garlic (about 15 cloves)
  • 1 T finely chopped peeled fresh ginger
  • 3 plum tomatoes, chopped
  • ¼ C sambal oelek (ground fresh chile paste) See “Liz’s Tidbits” below
  • 3 T white miso
  • 1 ½ t gr. coriander
  • 1 ½ t coarsely gr. black pepper
  • 8 C unsalted beef stock
  • 2T low sodium soy sauce
  • 1 ½ T light brown sugar
  • 8 oz. sliced mushrooms
  • 1 pkg. Thai rice noodles
  • 4 (4-oz.) baby bok choy, quartered lengthwise
  • ½ C sliced green onions
  • ¼ C cilantro sprigs

Preparation:

Heat 1 teaspoon oil in Dutch oven over medium-high heat.  Brown half of meat on all sides being careful not to overcrowd. Transfer cooked beef to a plate and repeat procedure with 1 teaspoon oil and remaining beef.

Heat remaining 4 teaspoons oil over medium high and add onion, garlic and ginger.  Cook, stirring often until onion is almost tender, about 6 minutes.  Stir in tomatoes, samba oelek, miso, coriander and pepper.  Cook, stirring constantly, 1 minute.  Add stock, soy sauce, brown sugar, and browned beef.  Bring to boil; partially cover and reduce heat to medium-low to maintain a simmer.  Cook until beef is almost tender, about 45 minutes.  Add mushrooms; cover and cook until beef is tender, about 30 minutes.

Cook noodles according to package directions; drain and rinse with cold water.  Drain well.

Add bok choy to soup; cover and cook until crisp-tender, about 4 minutes.  Arrange about ½ cup noodles and 2 bok choy quarters in each bowl.  Ladle about 1 ½ cups soup into each bowl, and sprinkle each serving with 1 tablespoon green onions.  Top with cilantro sprigs.

Liz’s Tidbits:

  • Sambal Oelek is a ground fresh chile paste that has a good amount of spicy heat.  This recipe calls for ¼ cup (4 T), which, for my family, is perfect because we love spice, but depending on your preference/tolerance for heat, make adjustments to the amount you use.  I wouldn’t suggest leaving it out as I strongly feel it is a vital component of the flavor profile of this soup, but you could certainly reduce the amount you use without losing the flavor it lends to the soup.  I’d suggest cutting it in half to 2T the first time, and see how you like it.

If you like this recipe, feel free to Tweet it, Facebook it, or just email it by clicking the “share” button below. 🙂

Banana Coconut Walnut Bread

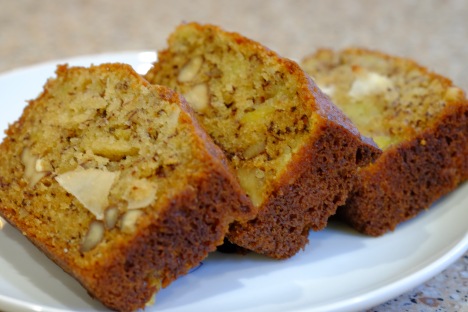
I think I’ve found my new favorite Banana Bread! This has got to be THE most flavorful and moist banana bread I’ve ever had the pleasure of eating. The recipe comes from one of my favorite eateries in Comfort, Texas called High’s Cafe & Store…a darling little place with fabulous food! If you’re ever in the area, do yourself a favor and stop in! They’ve just come out with a great little cookbook, too, called High Made Food.

I think the secret to this banana bread is baking the bananas “in their skin”, then cooling them before peeling and adding them to the batter. Whaaaaat, you ask? Yep, I’d never heard of doing that either, but boy, does it make a difference! Baking the bananas intensifies the flavor and the sweetness! What you’ll get is the most moist and flavorful banana bread you’ve ever tasted. Can we get a big AMEN to that??

Banana Coconut Walnut Bread

Banana Coconut Walnut Bread

Makes 6 medium loaves

Makes 6 medium loaves

Banana Coconut Walnut Bread

Recipe from High’s Cafe & Store, Comfort Texas

Ingredients:

  • 2 ½ cups flour
  • 2 teaspoons baking soda
  • 1 teaspoon salt
  • 1 cup toasted walnut pieces
  • ½ cup coconut (I used unsweetened coconut chips)
  • 6 very ripe bananas, baked and cooled
  • 2 cups sugar
  • 4 eggs, beaten
  • 1 tablespoon vanilla
  • 1 cup vegetable oil

Preparation:

For the bananas: Preheat oven to 350 degrees.  Prick 6 ripe bananas (NOT peeled) with a fork, and place on a foil lined cookie sheet.  Bake for 20 minutes, then remove and let cool.  They will be black and very sweet!

In mixing bowl, whisk together flour, soda and salt.  Add walnuts and coconut, and mix well.  In a separate bowl, add bananas and sugar and mash well with a potato masher, leaving some chunks of banana.  Add vanilla, eggs and oil and mix well.  Add banana mix to the flour mix and use the masher to blend together.  Portion into 6 prepared medium loaf pans (2 ½” x 5″).  Bake in a preheated 350 degree oven for 20 minutes, rotate and bake another 20 minutes.  Bread will be slightly pulling away from the sides and just set to the touch.  Cool at least 20 minutes before unmolding.


Liz’s Tidbits:

  • This recipe makes 6 medium-sized breads or 2 large. The batter can also be used for muffins.
  • These freeze really well for up to about 4 months!  Cool completely, then wrap each loaf in plastic wrap several times.  Then, either wrap in foil or slip into a freezer bag.

If you like this recipe, feel free to Tweet it, Facebook it, or just email it by clicking the “share” button below. 🙂

Sparkling Pomegranate Mimosas

Tis the season for festive holiday cocktails, so if you’re doing any entertaining this holiday season, these red and green showstoppers are a MUST DO!  Not only are they beautiful, but also a bit fancy and SUPER easy to pull off, too! And let’s be honest…a little bubbly just makes everyone feel happy and festive!  It’s a great way to start off any get together!

Pomegranate Mimosa

They make a beautiful tray!


Cranberry Mimosa

Sparkling Pomegranate Mimosa

Sparkling Pomegranate Mimosas

(Serves 4)

Ingredients:

  • 1 lime, halved
  • 2 tbsp. sugar
  • 1 c. pomegranate juice (very cold)
  • 1 bottle Champagne (very cold)
  • 8 fresh cranberries
  • 4 small sprigs fresh rosemary (4-5 inches)

Directions:

  1. Rub rims of champagne flutes with lime and dip in sugar. Pour 1/4 cup pomegranate juice into each glass and top with Champagne.
  2. Use a toothpick to poke a hole through cranberries. Remove bottom leaves from rosemary sprigs and thread skewer through cranberries to garnish mimosas.

Liz’s Tidbits:

  • Feel free to substitute Cranberry juice for the Pomegranate juice.  Just make sure both the juice AND Champagne are very cold!

If you like this recipe, feel free to Tweet it, Facebook it, or just email it by clicking the “share” button below. 🙂


SaveSaveSaveSave

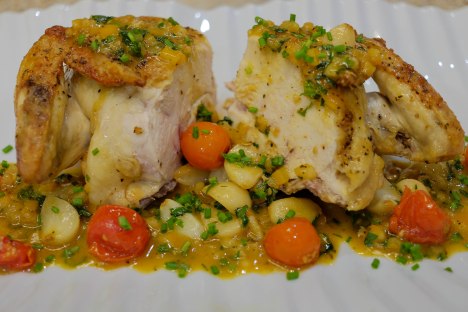
Spatchcock Roasted Chicken with Garlic Confit and Preserved Lemon

Chicken seems to be everyone’s “go-to” protein these days, and while I love the bird just as much as the next person, let’s face it…chicken can be BORING! You know what I’m talking about..overcooked, dry, flavorless–the list goes on. Well, let me tell you, this dish absolutely ROCKS in the flavor department, and the cooking technique produces a bird so moist and tender it practically melts in your mouth! I was amazed!
I’m sure you’re thinking by now, hmmm….spatchcock, confit, preserved lemons…not for me. Hold on–don’t let those words scare you off. Granted, they may not be in your everyday arsenal of kitchen jargon, but fear not! I’m hear to break it down for you, and make it simple.
Spatchcock-this is nothing more than splitting, then flattening a whole bird. You do this by cutting out the backbone (not hard at all with a good pair of poultry shears or serrated knife), then pressing the bird down flat giving it much more surface contact. In our case, that contact is going to be with a scorching hot cast iron skillet…think “very crispy, beautiful” skin! One more advantage to this technique is that it cooks quicker! Fast AND crispy! Win, Win!! Click HERE for a step by step “how-to” on spatchcocking.
Confít-don’t you just love all this learning? What IS confit, you ask? It’s french, and it generally refers to meat that’s been cooked and preserved in it’s own fat. Here, however, instead of meat we have garlic, and the fat of choice is olive oil. Quite simply, the garlic cloves are s..l..o..w..l..y simmered in the olive oil for about 30 minutes or so resulting in tender sweet cloves that just melt in your mouth. The added bonus is that you’re also left with a beautifully infused oil that is both fragrant and delicious!
Preserved Lemons-I can’t say enough about these!! I have jars and jars in my fridge! They are cut lemons rubbed with salt, then packed in a jar with more salt & lemon juice. They sit at room temperature for about a month and pure magic happens. In the end, the peeling has this incredibly intense lemon flavor with no bitterness whatsoever. Click HERE for how to preserve your own lemons and a few options for how to use them once you have! You can also buy them…higher-end grocery stores will carry them, World Market has them for $5.99 a jar or you can get the same jar on Amazon Prime for $10.99. It pays to price compare!
Now, on to the recipe!
Spatchcock Roasted Chicken with Garlic Confit and Preserved Lemon

Spatchcock Roasted Chicken with Garlic Confit and Preserved Lemon

Spatchcock Roasted Chicken with Garlic Confit and Preserved Lemon

adapted from Bon Appétit

Ingredients:

  • 20 garlic cloves, peeled
  • ½ cup extra virgin olive oil
  • 1 whole organic chicken, spatchcocked (backbone removed and bird flattened-see above for instructions)
  • kosher salt & pepper
  • 2 cups low-sodium chicken broth
  • 4 tablespoons chilled unsalted butter, cut into pieces
  • 2 preserved lemons, flesh removed, peel finely chopped
  • 2 tablespoons fresh lemon juice
  • 1 cup whole cherry tomatoes
  • ½ cup mixed tender herbs, chopped (such as parsley, chives, etc.)

Preparation:

Garlic Confit

Heat garlic and oil in small saucepan over medium heat until small bubbles appear around garlic.  Reduce heat and simmer “gently”, stirring occasionally until garlic is light golden brown 10-15 minutes, being careful not to burn.  Let cool in pan.

Chicken

Adjust oven rack to lowest position, place a cast-iron skillet on rack and heat oven to 500°.

Pat chicken dry with paper towels, rub with the garlic infused olive oil and season with salt & pepper.  When oven reaches 500°, remove skillet from oven, place chicken breast side down and immediately reduce oven to 450°.  Roast until well browned, about 30 minutes.

With heavy oven mitts, remove skillet from oven, and gently flip chicken breast side up. Add cherry tomatoes, brush chicken and tomatoes with more of the garlic infused olive oil and return skillet to oven for about another 10 minutes or until breast registers 160° and tomatoes start to pop. Transfer chicken to cutting board, cover with foil and let rest 10-15 minutes.  Place tomatoes in small separate bowl until sauce is ready.

Add broth to skillet and bring to boil over medium high heat, scraping up browned bits and cooking until reduced by about two thirds.  Add butter, one piece at a time whisking constantly until sauce thickens and coats the back of a spoon.  Remove from heat and stir in lemon juice, reserved cherry tomatoes, preserved lemon, half of the herbs and all the cooked garlic cloves.  Taste and season with salt & pepper.

To serve, carve chicken into pieces and spoon sauce over the top, sprinkling remaining herbs on top.

Liz’s Tidbits:

  • Any oil left from the garlic confit is delicious in salad dressings or drizzled over roasted potatoes

If you like this recipe, feel free to Tweet it, Facebook it, or just email it by clicking the “share” button below. 🙂

SaveSave

SaveSaveSaveSaveSaveSave

SaveSave

Hatch Green Chile & Cheese Cornbread

The weather has FINALLY turned cool here in Texas and I’m loving it!  When I heard that “Favorite Son” was coming home to visit for the day and bringing a friend, I decided the nice cool weather called for some good old comfort food!  I love cooking on Sundays and having the whole family over.  We call it Sunday Supper.
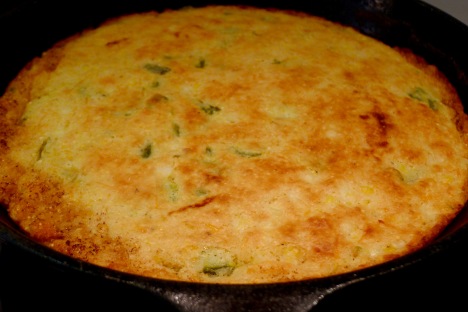
I put on a big pot of beef stew and baked this Hatch Green Chile Cornbread.  Both were outstanding, and I’ll post the stew soon.  For now, here is the cornbread.  It was moist, cheesy and had just a bit of heat from the chilis.  Hope you enjoy it as much as we did!
Hatch chile cheese cornbread

Hatch Chile/Cheese Cornbread

Hatch Chile/Cheese Cornbread

Ingredients

  • 1 cup stone-ground yellow cornmeal (I like Bob’s Red Mill)
  • 1 cup unbleached all-purpose flour
  • ¾ teaspoon kosher salt
  • ¼  teaspoon baking soda
  • 1 tablespoon baking powder
  • 1 egg
  • 1 ½  tablespoons  sugar
  • ¼ cup vegetable oil
  • 1-1/4 cups buttermilk
  • 2 tablespoons butter
  • 1 cup grated extra-sharp Cheddar cheese
  • about 1-½ cups frozen corn (or fresh if you have it)
  • ¼-½  cup chopped Hatch green chiles

Preparation

  • Preheat oven to 375°F. Place butter in a cast iron skillet and place in oven to melt.  In a medium-sized bowl, mix the cornmeal, flour, salt, baking soda and baking powder. In a separate smaller bowl, whisk together the egg, sugar, oil and butter­milk.  Add the wet ingredients to the dry and stir, just to combine.  Do not overmix.  Quickly stir in the cheese, corn and chiles.
  • When the butter has melted and the pan is very hot, pour in batter…it should ­sizzle as it goes into the skillet. Immediately transfer it to the oven and bake until light brown around the edges, about 25 minutes. Cut in wedges and serve warm.

If you like this recipe, feel free to Tweet it, Facebook it, or just email it by clicking the “share” button below. 🙂

SaveSave

SaveSave

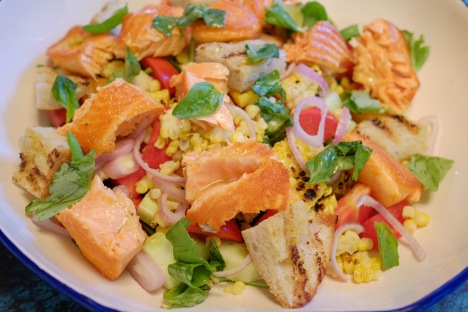
Grilled Corn and Salmon Panzanella Salad

Whether fresh from the garden or straight from the farmers market, one of the BEST things about summer is the abundance of really good tomatoes!  I just so happened to get my hands on some of the last tomatoes for this season and wanted to showcase them in a nice salad.  With the temperatures still soaring well into the 90s here in Texas, it makes it hard to want to turn on the oven, so this is a meal you can prepare outside on the grill!  Each ingredient in this salad stands out, so the key is to make sure you get REALLY GOOD “quality” ingredients…I, personally, like to use as much “organic” as possible.  Grilled sweet corn makes an appearance along with grilled ciabatta bread (panzanella actually refers to a Tuscan salad with bread).  Throw in some sliced English cucumber, thinly sliced shallots and fresh basil– then top it all off with some delicious New Zealand salmon (for you locals, Groomers Seafood is my favorite place to buy seafood, and they carry New Zealand salmon!)  A lovely light champagne vinaigrette takes it over the top!

Grilled Corn and Salmon Panzanella Salad

Grilled Corn and Salmon Panzanella Salad


2014 Paul Hobbs Pinot Noir

I served a 2014 Paul Hobbs Russian River Vally Pinot Noir…Fabulous!

Grilled Corn and Salmon Panzanella Salad

serves 4

Ingredients:

Salad

  • 4 cups organic mixed greens (I used spinach, arugula, swiss chard)
  • 2 ears sweet corn, grilled and kernels removed (I like to leave some of the kernels intact when slicing them off the cob)
  • ½ English cucumber, sliced
  • 1 shallot, thinly sliced
  • 2 cups diced heirloom tomatoes, (leave whole if cherry tomatoes)
  • handful fresh basil, torn into small pieces
  • 1/3 loaf ciabatta bread, sliced lengthwise
  • grilled salmon, skin removed (see Liz’s Tidbits)

Vinaigrette

  • ¼ cup champagne vinegar
  • 2 teaspoons Dijon mustard
  • 2 teaspoons honey
  • ½ cup extra virgin olive oil
  • kosher salt & freshly ground pepper

Whisk vinegar, mustard, honey, salt and pepper together.  Slowly whisk in olive oil until combined.  (See Liz’s Tidbits!)

Preparation:

Brush bread with olive oil, salt & pepper and grill, cut side down, until you get some nice grill marks. Cut into bite sized pieces and set aside. Grill salmon to desired doneness, remove skin and break up into nice chunks.  To assemble salad, put greens in a large bowl and add rest of ingredients.  Drizzle with vinaigrette.

Liz’s Tidbits:

  • For vinaigrettes, I like to add all my ingredients to a small mason jar, put on the lid and shake until combined.  SOOO easy!!! You can leave any unused dressing in the jar in the fridge for several days.
  • Instead of grilling a whole side of salmon, sometimes I’ll order (10 ounce) filets with the skin OFF from Groomers.  I’ll brush with just a bit of olive oil, then pan sear them (in an oven proof, non-stick skillet) over medium high heat for about 2 minutes or until a nice crust appears.  Turn over, and transfer the skillet to a 450 degree oven for maybe 3 minutes for medium to medium rare salmon.  Leave a bit longer if you like a more well done result.

If you like this recipe, feel free to Tweet it, Facebook it, or just email it by clicking the “share” button below. 🙂

SaveSave

SaveSave

SaveSave

SaveSave

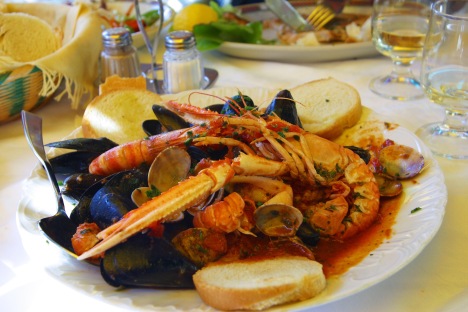
Cioppino and our trip to Cinque Terra, Italy

“Favorite Son” came home from college for the weekend, and requested one of his favorite dishes called “Cioppino”.  He and his dad have ALWAYS LOVED this dish, and since we were celebrating several things that evening with a very nice bottle of Champagne, I agreed.

Cioppino, (pronounced chə-ˈpē-nō) actually came to the U.S. by way of Italian immigrants who had settled in the San Francisco area.  If a fisherman came back at the end of the day empty handed, he would take his pot and walk around to other fisherman asking for any leftover fish they could “chip in”.  Whatever ended up in their pot would become their Cioppino! The dish later became a staple as Italian restaurants started popping up all over San Francisco.

Today, similar dishes are found in coastal regions throughout the Mediterranean. Generally, the seafood in the stew is cooked in broth and served in the shell. You can also serve what is called “lazy man’s cioppino”, referencing the fact that all shells have been removed prior to serving…not as much fun, but much less messy!!

My fondest memory of enjoying Cioppino is from our trip to Cinque Terra in northwestern Italy.  Vernazza, one of the five towns that make up the Cinque Terra region is one of the most quaint little fishing villages on the Italian Riviera…just breathtaking!  Hubby and I hiked from Monterosso al Mare (the first of the villages) up one side of the mountain and then down to the next village of Vernazza.  We lunched at a little cafe called Taverna Del Capitano and had the most wonderful Cioppino we’d ever tasted!

This particular recipe is one I’ve adapted from Chef Tyler Florence after trying several different styles.  While it’s not necessarily authentic due to the added Spanish chorizo, it makes for a much heartier broth, and my boys say it’s their favorite!  Please don’t mistake Spanish chorizo for Mexican chorizo–it’s definitely not the same!  Click on this “link” for a wonderful Spanish chorizo that’s actually made right here in my own home town of Boerne, Texas! Serve with a nice crusty loaf of french bread for soaking up all that delicious broth! Bon Appétit!!

Cioppino

Cioppino served at Taverna Del Capitano in Vernazza

Monterosso al Mare

We hiked up Monterosso al Mare…about a 3 hour hike!


Cinque Terra

It’s a beautiful hike meandering through lots of vineyards, and the locals living along the hike are so friendly!


Vernazza

HELLO Vernazza!! Once you’ve hiked to the top of the mountain, this is the view you feast your eyes on! Just breathtaking!


Vernazza, Cinque Terra, Italy

Each little inlet is it’s own fishing village only accessible by boat or train.


Vernazza, Cinque Terra, Italy

Isn’t this just GORGEOUS?

Cioppino-Seafood Stew

adapted from Tyler Florence

Ingredients:

  • 5 links “Spanish” chorizo
  • 1 large onion
  • 2 garlic cloves
  • 2 ribs celery
  • 1 (28-ounce) can Marzano tomatoes, drained, hand-crushed with juice reserved 
  • 2 tablespoons all-purpose flour
  • 1/4 bunch fresh thyme
  • 2 bay leaves
  • 2 cups dry red wine
  • 6 cups low-sodium chicken stock
  • Salt and pepper
  • 16 clams, scrubbed
  • 16 mussels, scrubbed
  • 16 large uncooked shrimp, peeled and deveined
  • 12-15 bay scallops
  • 1 small filet of cod (cut into 4 pieces approx 3-inches each)
  • 1/4 bunch Italian parsley, chopped for garnish
  • Kosher salt and freshly ground black pepper
  • Extra-virgin olive oil

Preparation:

In the bowl of a food processor, place chorizo, onion, garlic, celery and tomatoes, and pulse until pieces are small and well ground up.  Transfer this mixture to a Dutch oven, and cook over medium heat until well colored and fat is rendered. Once cooked, add the flour, thyme and bay leaves, and sauté for another 5 to 7 minutes (this forms the base of a roux). Add red wine, reserved tomato juice and chicken stock. Season lightly with salt and pepper, then cover and simmer for 30 minutes. With 10 minutes left go, bring to a boil and add the clams and mussels.  Cover and steam until mussels and clams open (5-7 minutes) and discard any that don’t open. Reduce the heat to simmer, nestle fish into bottom of pot, add scallops and shrimp, cover, and simmer just until cooked.  This will only take a few minutes, so be careful not to overcook.  Remove the bay leaves, ladle into large shallow bowls and sprinkle with chopped parsley.  Serve with a crusty french bread!

Bon Appétit!

Liz’s Tidbits:

  • Any mixture of seafood will work in this stew, so choose your favorites! Throw in some crab legs or maybe try a couple of whole Dungeness crabs (cut into about 6 pieces).  If you don’t like cod, try halibut or any other firm white fish.  Just add all the seafood at the last part of cooking so it’s not overcooked!
  • I can’t emphasize enough the importance of using “Spanish” chorizo and NOT Mexican chorizo.

If you like this recipe, feel free to Tweet it, Facebook it, or just email it by clicking the “share” button below. 🙂

SaveSave

SaveSave

SaveSave

SaveSave

SaveSave

SaveSave

SaveSave

SaveSave

SaveSave

SaveSaveSaveSave

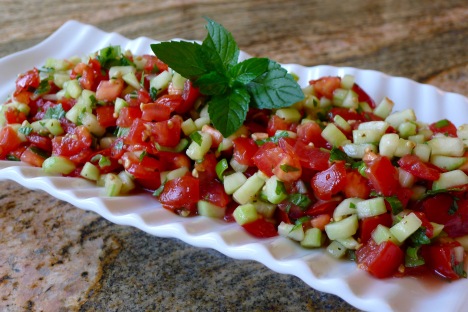
Shirazi Salad

If you’re looking for a totally refreshing salad for a hot summer day, look no further! OMG…I could eat this all day long! You’ll find it on many mediterranean restaurant menus, as it’s named for the Iranian city of Shiraz, the capital of Fars Province. Many recipes call for various different ingredients, but the one I tasted was simple and light and utterly addicting! Tomatoes, cucumbers, onion and mint surrounded by a light fresh lemon dressing. It’s a marriage made in heaven!

Shirazi Salad

Shirazi Salad

Shirazi Salad

Ingredients:

  • 3-4 cups diced tomatoes
  • 2 English cucumbers, peeled, seeded and diced
  • ½ cup chopped fresh mint
  • ¼ cup red or green onion, diced
  • ⅓  cup fresh lemon juice
  • ¼ cup extra virgin olive oil
  • ½ teaspoon salt
  • ½ teaspoon pepper

Preparation:

Place tomatoes, cucumbers, onions and mint in a bowl.  Whisk together lemon juice and olive oil and add salt and pepper to taste.  Combine all and stir.

If you like this recipe, feel free to Tweet it, Facebook it, or just email it by clicking the “share” button below. 🙂

SaveSave

SaveSave

SaveSave

SaveSave

Mom’s Rich Cocoa Crinkle Cookies

About a year ago, Mom moved from Oregon back to Texas.  There’s a saying that you can take the girl out of Texas, but you can’t take Texas out of the girl! We are all VERY happy to have her back here where she belongs!  With that said, Mom loves to bake! I’m not saying we wouldn’t love her just as much if she didn’t, but let’s just say we love it that she does!  These chocolate crinkle cookies are TO…DIE…FOR!  Rich chocolate bites of chewy goodness that completely satisfy that chocolate craving!  Be careful…they’re so good you might find them disappearing just as quickly as you take them out of the oven!

Mom's Rich Cocoa Crinkle Cookies

Mom’s Rich Cocoa Crinkle Cookies

Mom & Me at Tyler Florence's Wayfare Tavern in San Francisco

Mom & Me at Tyler Florence’s Wayfare Tavern in San Francisco

Mom’s Rich Cocoa Crinkle Cookies

makes about 6 dozen cookies

Ingredients:

  • 2 cups sugar
  • ¾ cup vegetable oil
  • 1 cup Hershey’s cocoa
  • 4 eggs
  • 2 teaspoons vanilla extract
  • 2 ⅓ cups all purpose flour
  • 2 teaspoons baking powder
  • ½ teaspoon salt
  • powdered sugar

Preparation:

Stir together sugar and oil in a large bowl.  Add the cocoa, beat until well blended, then beat in the eggs and vanilla. Stir together flour, baking powder and salt, then gradually add the cocoa mixture, beating well. Cover and refrigerate until dough is firm enough to handle, at least 6 hours.

Heat oven to 350°, and line a cookie sheet with parchment paper (if no parchment, spray with nonstick spray). Shape dough into 1-inch balls, roll in powered sugar to coat then place about 2 inches apart on prepared cookie sheet.

Bake 10-12 minutes or until almost no indentation remains when touched lightly and tops are crackled. Cool slightly, then remove  to a wire rack to cool completely.

If you like this recipe, feel free to Tweet it, Facebook it, or just email it by clicking the “share” button below. 🙂

SaveSave

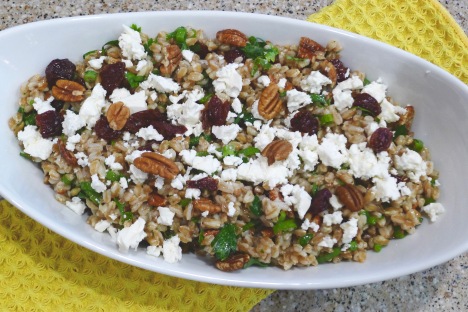
Farro, Dried Cherry & Toasted Pecan Salad w/Feta

Never heard of farro?  Well, it’s a type of ancient wheat grain, and you might be surprised to know that it’s been around for thousands of years! Because of its high fiber content, it’s gaining popularity for it’s many health benefits.  And, we’re all over health benefits, right??  This salad combines the nuttiness of the farro, the sweetness of the cherries and the saltiness of the feta all in one healthy dish.  Throw in some pecans for crunch, fresh parsley and green onion to freshen it up and a light and tangy fresh lemon dressing to finish it off.  It’s one of my new favorites!  🙂

Farro, Dried Cherry & Toasted Pecan Salad w/Feta

Farro, Dried Cherry & Toasted Pecan Salad w/Feta

Farro, Dried Cherry & Toasted Pecan Salad w/Feta

Adapted from Southern Living Magazine

Ingredients:

  • 1 cup farro
  • 2 cups low sodium chicken broth
  • ½ cup toasted pecans, chopped (See Liz’s Tidbits)
  • ¾  cup dried cherries
  • ⅓ cup chopped green onions
  • ¼ cup chopped italian parsley
  • 3 tablespoons fresh lemon juice
  • 2 tablespoons extra virgin olive oil
  • ½ cup feta cheese

Preparation:

Bring farro and broth to a boil over high heat.  Reduce heat to low, cover tightly and cook until the farro is tender 20-25 minutes.  Drain and rinse with cool water. Then set aside to cool.

Once cool, stir in remaining ingredients.  I like to add my feta cheese to the top just before serving.

Liz’s Tidbits:

  • To toast nuts, place them on a rimmed baking sheet and bake at 350° for 5-7 minutes or until lightly browned. I like to toast a whole sheet pan full then keep them in a mason jar in the fridge for when I need them.
  •  I like organic produce when I can get it.  It’s just a personal preference.

If you like this recipe, feel free to Tweet it, Facebook it, or just email it by clicking the “share” button below. 🙂

SaveSave

SaveSave

SaveSave

SaveSave

SaveSave

SaveSave